For Porter's second birthday I was completely inspired by
Pinterest. I made this
hedgehog watermelon, these
animal cracker celery sticks, and these
cute banana bites (minus the meraschino cherries because... gross).
But the cakes. So many amazing cakes to choose from! I decided to keep the decorating simple. I loved the look of these sweet
sprinkle cakes. Then I saw it. The ever popular
Rainbow Cake. I could handle that. I did look at the one with
natural dyes, which is beautiful, too... but didn't pack the punch that the dye-saturated one did. I figured it was one cake out of the year and decided to go for it. I also made a few plain vanilla cupcakes for any dye-sensitive guests that were coming. Easy. Simple. Nothing to stay up nights thinking about the logistics of how I would make it. Then I happened to see
this. Oh. Hmmmm. Suddenly I was up at night thinking of the logistics. Did I really want to make two of each cake, or cute each layer in half? What about making the heart a solid color? Which color? How exactly did she do it? What frosting would I use? Porter wanted an octopus on top... gum paste or fondant?
So, based on
this cake and
this tutorial, here's what I made:
It totally feels like a leap of faith... I wasn't sure how the heart would turn out as I put it together. It wasn't until a few slices into it that I could see that it really did look like a heart! Here's another not so blurry picture, but with more muted color. I took these with an iphone app, so they aren't the best, but you get the idea!
If you're thinking about making a cake like this, I highly recommend using a strong buttercream for the layers and
crumb coat. I found the
most delicious buttercream on the face of the earth. A little lemon juice and kosher salt add jut the right touch. I liked the look of the thick frosting in between each layer, but it was incredibly sweet and rich. I figure, whats a birthday cake supposed to be, if not sweet? Plus I wanted the sturdiness to hold up all those layers. For the outside I used this Fluffy White Frosting. Its like a meringue or 7 minute frosting. It tastes like marshmallow and looks beautiful, with a nice sheen. Plus, it is sticky enough for the sprinkles to attach nicely.
The other tip is to stick the cakes in the freezer every step of the way. It will make carving and crumb coating easier. I use one of
these to get the layers nice and even. A turning cake stand like
this will make frosting it easier. To get the sprinkles on the side of the cake I just used the shaker they came in and shook like crazy, then swept up the mess.
The tutorial had me crumble up the pink cake for the heart and mix it with some frosting. I did this, but I'm not really sure why. It did hold together nicely, but it was a little harder to cut through, having somewhat of a light play-doh consistency. I might try it again next time with just the crumbled cake smooshed in there.
So there you have it! A super fun, simple-ish, birthday cake.


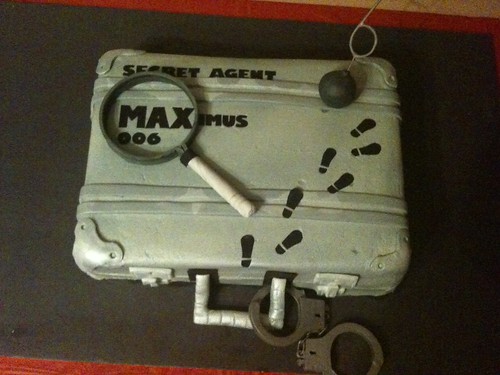
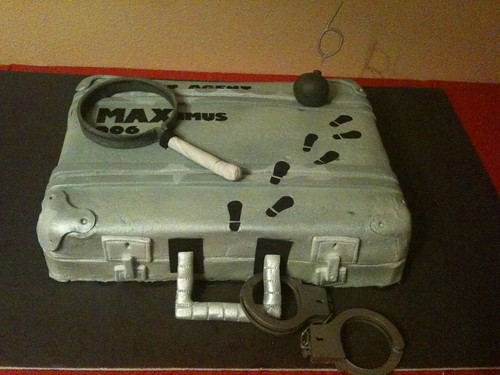 The large body is cake, the rest is sculpted with rice krispie treats. Covered with buttercream and fondant. The spikes, dots, claws, and eyes are gum paste.


 Colored white chocolate and edible markers to draw on the birthday cakes. I poured white chocolate in the holes on the foam so they were overflowing, then set Sensei Wu on top and poured more white chocolate over. Once it hardened he was pretty sturdy.


